Tuesday, September 30, 2014

Happy 30th of September!

It's hard to believe it's already the end of September.  The month has flown by.  We've finally gotten some cool weather for September, still quite nice for T-shirts and shorts, of course, but we received some much needed rain.  We all have our fingers crossed for more rain this winter.

Since September has come to an end, we all would like to thank Bugaboo Digital Stamps for their sponsorship and we have a few cards that really show our love of their stamps for our last day.

Cathie
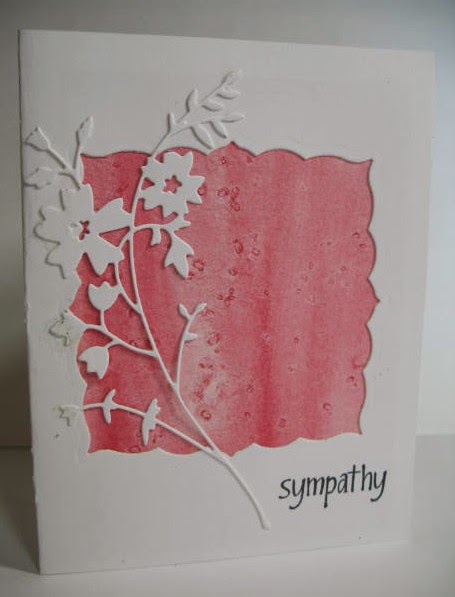
The new technique is called Cutout Panels. Maile Belle from Papertrey ink showed it on her blog and their newsletter and Cathie wanted to try it.
Believe it or not this is the first time Cathie has used loose glitter (on her wings) She had it in her stash for a while but didn't want to get it everywhere.
This gorgeous Bugaboo image is also new to Cathie too.
Be sure to visit Cathie at House of Borowski. 

Arlene
Arlene absolutely loves this Shopping Nut image and had to try a new design too.  It almost looks like one of those old-fashioned penny-farthing.  The penny-farthing, also known as the high wheelhigh wheeler or ordinary, is a type of bicycle with a large front wheel and a much smaller rear wheel (Wikipedia definition for Penny-farthing).  Arlene thanks Bugaboo Digital Stamps with a fabulous day!  Arlene at A Little Bit of This and That.

Have a great end of September from Arlene and the Die Cut Divas.

Monday, September 29, 2014

Vintage goodness

This fun card was made by Hilde, see her description below

I do struggle with CAS cards, and for this card I have used some new pre embossed paper for the background, and the red flower is a new type of flower I purchased which I normally don't use on my cards. I could almost say the colour combo is also new to me....


Hilde has left us, due to medical issues among other things, but I would like to thank her for the inspiration she has been to us, and Hilde we will miss you!

Hannah and the DCD design team

Sunday, September 28, 2014

Watercolor for Fall

One more water color card for the month of September.  I think this card is a great Fall card and puts me in the mood to welcome a change in weather.

This technique was a Wet into Dry over Wet into Wet Background.  Remember that I am using water color paper.  I'm afraid I didn't get as much Wet into Wet background as I wanted to, but I really like how it turned out.  

Direct from our teacher, Susan, at The Stamp Art Shoppe, "Wet paper with brush and then paint directly onto stamp in various fall leaf colors.  Stamp several times in wet paper.  Dry thoroughly.  Paint onto the stamp agian making the colors a bit darker.  Stamp over the background image once or twice to add definition".   I was supposed to stamp an Asian poem in block over the leaves, but I forgot to.  It would have added more depth, but I'm good with this too.  I stamped a Kaiser Craft sentiment from a dear friend on the bottom right.  I really love the colors and sheer joy of Autumn in this card.  A fun technique and a very easy one.

Arlene and the Die Cut Divas

Saturday, September 27, 2014

Water Color Technique - Wet on Wet

Wet Watercolor onto wet paper

I took a class this month at my LSS and played with watercolors.  You never know what you'll get playing around.  Here's what Susan, our instructor, had to say about it.  "Brush paper with clean water.  Paint directly on to stamp with watercolors.  Stamp on to wet paper".  Now isn't that easy?  While the image is still wet, you paint with the background color (blue here).  It's easy to move the blue into the spaces between your painted flower.   When the watercolor has dried, you can stamp on top of your paper.  I used an open fence type stamp on the right and part of a "writing background" stamp on the left.  You can finish as you wish with your card.

NOTE:  I added some yellow, brown and orange to my original stamped image to bring out more color.

I hope you enjoyed my little watercolor here.  I'm in no way thinking I'm a grand painter, but I'm certainly working at having fun!

Arlene and the Die Cut Divas

Wednesday, September 24, 2014

Cat in the Hat

 
 I love this Card by Marsha!
The colors are perfect, and the wood grain base is just the right touch! The saying makes a great card as well, I must have completely missed this on Bugaboo's website but I will definitely have to get this one

 Hannah and the DCD Team
 

Monday, September 22, 2014

Distress ink watercoloring


I Love using distress inks and use them on nearly every project, and for two years now I have the markers as well, but have really never used them, so I decided this challenge was the perfect opportunity to put them to use.
 
My photo doesn't quite do it justice, I would have taken more time to get a good shot, but this had to be sent out right away for my "bosses" Birthday.
Any how I was never quite sure how the best way to use the markers was, so I YouTubed it and decided to use them for water coloring.
 
The patterned paper went perfect with my piece, but I have no idea of the brand or anything, it's one of those things that came from a friends friend.
 
Hannah and the DCD Team
 

Saturday, September 20, 2014

My Salted Card - a Wet into Wet Technique

Sometimes you need a sympathy card and I needed one for a friend, so this card is gone, but I think the technique will stay. The watercolor paper behind the notecard was given a wash of pink watercolor paint and a a sprinkle of salt.  This is another watercolor technique I picked up this month at my watercolor class.  Totally FUN!

I brushed the watercolor paper with clean water, then picked up color with a very wet paintbrush.  I washed the color over the paper, keeping it fairly wet.  I had a choice of Epson salt or Kosher salt.  Kosher salt will make smaller dots on the surface of the paper. I hope you can see the dots in the paper that look like they might have been made with some kind of embossing folder.

The salt sits on the wet watercolor until the paper is dry.  You can just flick the crystals of salt off and voila!  Instant COOL background.  I glued the watercolor paper to the die-cut front of the card and then overlapped the front with a die-cut flower.

Close-up of the salted watercolor paper. 

Arlene and the Die Cut Divas

Thursday, September 18, 2014

An Elephant that Swings.

So here at Diecut Divas, September is all about New Things, so with that in mind here is another new technique to share with you .

Using the adorable Bugaboo Image Edward Present I have created a card called a Swing or Flip Flop Card. 

House of Borowski, Bugaboo Edward Present, Swing Card, flip flop card.

House of Borowski, Bugaboo Edward Present, Swing Card, flip flop card.

House of Borowski, Bugaboo Edward Present, Swing Card, flip flop card.

so here is how you can create this card for yourself.

Die Cut Divas, House of Borowski, Bugaboo Edward Present, flip flop card.

Starting with a a piece of card stock 5.5" x 7.5" measure across on the long edge 2 5/8" and score down 0" to  3/4" from the top and 5.5" to 4 3/4" up from the bottom. Then measure further until you reach 3 5/8" and again score down 0" to  3/4" from the top and 5.5" to 4 3/4" up from the bottom.
You should end up with card stock resembling the above.

If you are wanting to use pattern paper on your card - I would put it in place now before die-cutting; this way you will have nice clean borders where the swing section is. Remember to only use adhesive of your choice on the top and bottom and the outside edge of the pattern paper and line it up so you have a nice border from the score line.

Die Cut Divas, House of Borowski, Bugaboo Edward Present, flip flop card.


 With your die of choice, line up the centre of the die with the first score line (if your die has points this is easier, if you are using a circle or oval you will have to measure the diameter to find the centre) hold the die in place with post its, washie tape or tape that has lost its sticky.

Die Cut Divas, House of Borowski, Bugaboo Edward Present, flip flop card.


I am using a Cuttlebug but it is the same theory with a Big Shot. line up your cutting plate edge with the first score line and run through.
Die Cut Divas, House of Borowski, Bugaboo Edward Present, flip flop card.

Flip the card stock around and again line up the edge of the cutting plate edge with the second score line.

Die Cut Divas, House of Borowski, Bugaboo Edward Present, flip flop card.
This allows you to create the shape with the section between the score lines uncut, and allows for the swing section.

Fold your score lines and add focal image and sentiment.

If you would like a full list of products I have used  head over to my blog at:


Tuesday, September 16, 2014

Quick Watercolor Technique Wet Watercolor on Dry Paper

I took a class on watercolor techniques at my local stamp shop, The Stamp Art Shoppe, in Roseville, California.  Susan, our teacher, also conducts Copic coloring classes.

Here is an easy peasy card because it is easy to make your colors go where you want them to.   Yes, this was no accident.  hehehe  If your paper is dry, your watercolors won't run out of control as much as a wet on wet technique.  Just a tip.  As Susn says, "it is easier to contain the color where you put it".  You put your wet media (watercolors blue and green) on the paper and tilt the paper so you get the drips and runs where you want them.  Now I wanted purple after I had the blue and green on, so that's what I did.  I added the purple, tilted the card and let it run.  I really liked the addition of a third color.  Let it dry and then stamp a large stamp to give it some cohesion.  A ribbon here added some interest.

I didn't get the image stamped well here, but if I didn't tell you, you wouldn't have known it.  The happenstance of art!

I really do like the way this turned out.

Monday, September 15, 2014

Which Machine is for you!


This week we will be sharing some helpful videos for die cutting, To start here is a great video for those of you looking to get a die cutting machine and see which is for you, Enjoy!

                                      Part 1


                               Part 2


These informative videos is put out by "Cut at Home"


Hannah and the DCD Team

Friday, September 12, 2014

It's all in the Fringe


You can tell I'm having fun with these western bugaboo digi's!  I printed out the saddle a little bigger than I intended, but I really like how this turned out

.
When I started out I saw that something was needed to offset the enormous saddle, I must have racked my brain for 15 minutes before the idea struck, but finally (and this took a half hour) I used a border punch and threaded the embossing twine then I cut 28 small strips of the same and carefully adhered each bunch. The embossing folder I chose (which is new) seemed the perfect addition, as it reminded me of a afghan throw you might throw over a saddle.
 
I hope you have a great weekend! Come back next week for some great tips in regards to your dies.
Hannah and the DCD Team
 

Thursday, September 11, 2014

Make a Joyful Noise


Before you read on let me just say I apologize, I set this post up on the wrong blog, so this post has been delayed a wee bit.

Hilde has a stash of new products here, on these two lovely cards,


Please keep her in your thoughts and prayers, as she has not been doing well and undergoing several medical tests, although she is new to our DT and we have come to enjoy her and her beautiful work, she will be leaving although we hope she will now and again  join us if she feels up to it.

Monday, September 8, 2014

The Color Wheel Technique

Arlene has a great technique here with these two cards, using a color wheel to combine coordinating colors. 
 in her own words;
Another technique for me.  This Technique in using the color wheel is choosing analogous colors with one complement.  I used three analogous colors on this card, consisting of Yellow, Yellow-Green and Green.  I then used the complementary color of Green, which is Red.

I used three colors next to each other on the color wheel.   Taking a section from Dina Wakely's handout practice sheets, "These colors harmonize well and even blend into each other.  The effect is similar to a monochromatic scheme, but with more visual interest.  The gradual changing of the colors is pleasing and suggests form and depth". Another practice handout contained boxes again for practice using analogous with complement.  That's the technique I used here.

Analogous with Complement.  Analogous is 2 to 3 colors next to each other on the color wheel.  You add a color that is complementary to the middle color or actually to whichever color looks best of the paint you're using, but usually the middle color.  A Dina Wakely moment please:  "This scheme gives you the harmony of the analogous scheme, and a bit of pop from the complement."  I think it works!
I hope the color wheels below are helpful.  The two circles directly below are from worqx.com
complementary colors - red and greenComplementary Colors: Those colors located opposite each other on a color wheel.

analogous colorsAnalogous Colors: Those colors located close together on a color wheel
The wheel below I found by googling "color wheel" right here
Thanks Arlene I love this idea don't know I never thought of this when I'm stuck and don't know what colors to use.
Hannah and the DCD Team

Friday, September 5, 2014

Yeehaw! Grab your Boot's and Saddle up.


While I haven't yet attempted a new technique there are plenty of new things here
 
I got "Dottie 2 step" a while ago from bugaboo, and when I saw the boot and saddle in their repertoire I thought they would be the perfect combination for her.
I also am in the habit of making a similar design on all my cards but this time I decided to do something new and change my style up a bit, using several and randomly placed images,
the embossed background is a folder I recently purchased at my local Hobby Lobby. 
 
 
I had so much fun putting this together, and playing with all my "new" stuff!
 
Have a Great Weekend,
Hannah and the DCD Team.


Wednesday, September 3, 2014

Of Giraffes and Coffee Addicts

Hey Readers!
Today I'd like to share with you some fun Cards made by Marsha, 

Isn't this cute!  Here Marsha used a new fun technique with wax paper for that pretty sky background.
 
 
And here she used newspaper as a background (isn't that a neat idea!), and for the "coffee rings" she inked a small  circular object,  the stamp is also a new image.

I Love them, and so many good idea's are packed into these sweet cards! I hope this inspires you as it did me.
Hannah and the DCD Team

Tuesday, September 2, 2014

August Challenge Winners

I'm here to announce our winners for the August challenge.  Isn't it just great that three of our artistic entries for August will each win a $15.00 gift certificate to go shopping at Oozak, our fantastic sponsor for August.

Please email your your email addresses to our blog and I will submit your names and emails to Oozak so they may contact you to tell you how to collect on your gift certificate.

And the winners are:

# 1:  Julie Reed  

# 2:Jane of Jane's Journal  

# 3: Gail of I like Paper  

Congratulations to you all from the Die Cut Divas!


Monday, September 1, 2014

September challenge - New Things

I hope you all had great fun enjoying those "summer nights of August" and I'm looking forward to see what September will bring us.

This Month I challenge you to do something new! step outside your comfort zone, try a new technique, or even a new fold, who knows you might like it! Did you go shopping and buy something "new" to play with? or maybe you want to try a new color combo.

Remember you must at least use one die cut or embossing folder and while we're at it remember all cards/projects must be "new" and dated after the first of September.

This Month Our generous sponsor is Bugaboo, and we are excited to once again inspire you with their variety of cute and funny images.


If you have any questions feel free to drop us a line


Here are some lovely examples from Our Diva's


 Marsha - used a new image (The unicorn)

For this card I have tried to stretch myself a little, this layout is totally new to me, and I am not sure what I was trying to achieve, lol, eclectic Vintage maybe....the embossing folder is new as well...blessings Hilde
Visit Hilde at Happy Glitzy Girl

 New Technique - Complementary colors - yellow and purple on the color wheel - I'm using brown as a neutral like black or white 
(yes the saddle and plastic circle look blue, but are not)
Hannah used this cute new image from Bugaboo,
and the ants symbolize hard workers since this card is intended as a thank you for help


Cathie - House of Borowski
Its a New Image,  I have tried a new card fold - I don't know what its called though and you can't see it but there is double embossing on the inside of the card.

Dawn

Using a new Digi from Bugaboo.  New stamps from Kaisercraft and Winnie & Walter.

Enter here and make sure and drop us a line in the comments below and tell us what you did "New"!
Hannah and The Die Cut Diva's